The Tabulate Pro ribbons, along the top of the Tabulate Pro workspace, provide options for designing and formatting the tabulation, providing logic, querying and merging data, and data manipulation functionality.
- For more general information about the workspace, see Tabulate Pro Workspace.
Common options
Run tabulation
Click Run tabulation (purple highlight, above) or press the F2 key on your keyboard to run your tabulation.
Ribbon selection
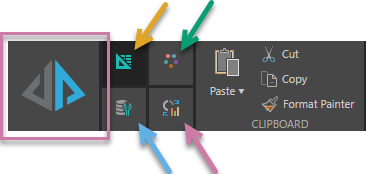
Due to the tremendous amount of flexibility provided by Tabulate Pro, the ribbon is split into four. To access the required ribbon options, simply click its corresponding tab as indicated in the preceding image:
- Tabulation ribbon (orange arrow above).
- Design ribbon (green arrow).
- Advanced Settings ribbon (blue arrow).
- Component ribbon (purple arrow).
Tabulation Ribbon
This ribbon is displayed by default when Tabulate Pro is started. It can be opened, when required, by clicking the Tabulate tab on the ribbon (orange arrow below):

Tip: The ribbon is expanded by default. To free up canvas space, click the chevron (blue arrow above) to collapse it. With the ribbon collapsed, you'll need to hover over the minimized buttons to see the options. Click the chevron again to expand the ribbon.
Items on the Home ribbon provide access to the most frequently used functions within Tabulate:
|
Function |
Description |
|---|---|
|
Cut, copy, paste and apply the format painter to copy formatting from one cell to other cells. |
|
|
Format fonts, font sizes, indentation, font formatting, borders, and colors to the selected text. |
|
|
Apply vertical and horizontal alignment, word wrap, and merge and center. |
|
|
Format numbers, currencies, percentage, comma, and increase or decrease of decimal places. |
|
|
Styles |
Format selected text using conditional formatting or using a selected table style. |
|
Editing |
Use the AutoSum, Sort & Filter, and Find & Replace functions on your selected text. |
|
Worksheets |
Use actions that apply to the worksheet as a whole. Includes options to create and manage visual areas and to insert, delete, and resize cells. |
Tip: In addition to the Font Formatting options above, it is also possible to select cells and format the text in those cells using the shortcut keys Ctrl+B (bold), Ctrl+I (italic), and Ctrl+U (underline).
Design Ribbon
This is displayed when you click the Design tab on the ribbon:

This provides access to various functions to define the appearance of a Tabulation:
|
Function |
Description |
|---|---|
|
Design |
Apply a Theme to your tabulation. Reset the Formatting to the default settings, and enable or disable gridlines and headers. |
|
Slicers |
Select the style (Classic, Modern, or Clean) and position (Default, Left, Right, Top, or Bottom) for your slicers. |
|
Window |
Lock (or "freeze") specific rows or columns in place so they remain visible while you scroll through the rest of your workspace. |
|
Cells |
Add more rows and columns to your tabulation. Note: Tabulations have a fixed number of rows and columns. |
|
Print Area |
Set or clear the Print Area. |
Advanced Settings Ribbon
This is displayed when you click the Advanced Settings tab:

This provides access to various advanced functions for use with a tabulation:
|
Function |
Description |
|---|---|
|
Logic Tools |
Enable Functions to be inserted in a Tabulation. Also, provides access to Solve. |
|
Query Tools |
Allow slicers to be applied to a visualization. Also, provides access to Parameters, enables Global Parameters to be defined and attached to (or detached from) a Tabulation, and enables internal parameters to be defined |
|
Data |
|
|
Import spreadsheets into the current worksheet. |
Component Ribbon
What is presented as the fourth option on the ribbon depends on your tabulation:
Change Visual
By default, the Change Visual Ribbon is shown. This allows you to change the visualization for the currently selected visualization to any of the visualization types.

For information about the Visualization Types that are available here, see Visualization Types in the Discover Pro help.
Table Design
If your tabulation includes a table, and you have one or more cells from that table selected, the Table Design Ribbon is shown. This allows you to configure the settings for your table.

For more information, see Table Formatting in Tabulate Pro.